Instructions
WordPress Plugin: My Syntax Highlighter PRO
This is the “My Syntax Highlighter PRO” plugin instructions page. We have tried our best to keep it as simple as possible. If you think it can be made even simpler let us know we will be glad to change it. Let’s start!
On the left side, you can see the table of contents of this documentation. Jump to the section you want, or read it all through – your choice. Let’s move on!
This plugin is currently in the active development stage, which means that in the shortest possible time many new features will be added to it. As soon as we receive a request for a new feature, we immediately begin work on creating an update of the plugin to make our lovely customers happy. We are already preparing new versions for publication, and now they are undergoing testing. We will do our best to better develop the plugin and add the requested features as soon as possible.
Purchase process
To start using the “My Syntax Highlighter PRO” plugin, you need to make a purchase on the official page of this plugin. To do this, select a license suitable for your case and make a payment. Secure payment of the plugin is done using the platform of our partner Gumroad.
After the successful completion of the purchase, you will receive an email receipt with a button through which you can download a copy of the plugin.
Download the latest release
Delivery of the “My Syntax Highlighter PRO” plugin is done using the platform of our partner Gumroad.
There are two methods to download the latest release of the plugin. You can download it directly from the Gumroad website, or you can download it using the button in the email with a receipt.
- After purchasing a copy of the “My Syntax Highlighter PRO” plugin, you should have received an email with a receipt from Gumroad with a link to download the latest release of the plugin. This link should be fine for future downloads of the plugin, so please keep the email save for later usage.
Don’t worry if you deleted this email. We periodically send email notifications (with the download information) whenever there is a major update of the plugin. We do not send email notifications very often so as not to annoy our lovely customers.
- If you have a Gumroad account, you are able to access your Gumroad purchases at any time through your Library. Please visit the How do I Access My Purchase page on the Gumroad website to learn more.
Installation
Install “My Syntax Highlighter PRO” plugin just as you would any other premium WordPress plugin.
There are two methods to install the plugin. You can install it directly from the WordPress Admin Area, or you can install it manually via FTP access.
Automatic installation (via WordPress Admin Area):
To install the plugin automatically (from the WordPress Admin Area), please perform the following steps:
- Download the ZIP archive with this plugin to your computer. After downloading you should have a ZIP archive called
my-syntax-highlighter-pro.1.0.zip. This is a compressed file containing all the folders and files required for the plugin to function properly. - Log in to Admin Area of your WordPress website.
- Go to
Plugins->Add New. - Click
Upload Plugin, and browse the ZIP archive with the plugin. Click theInstall Nowbutton. Wait a few seconds until the plugin is installed. - Activate the plugin through the
Pluginstab.
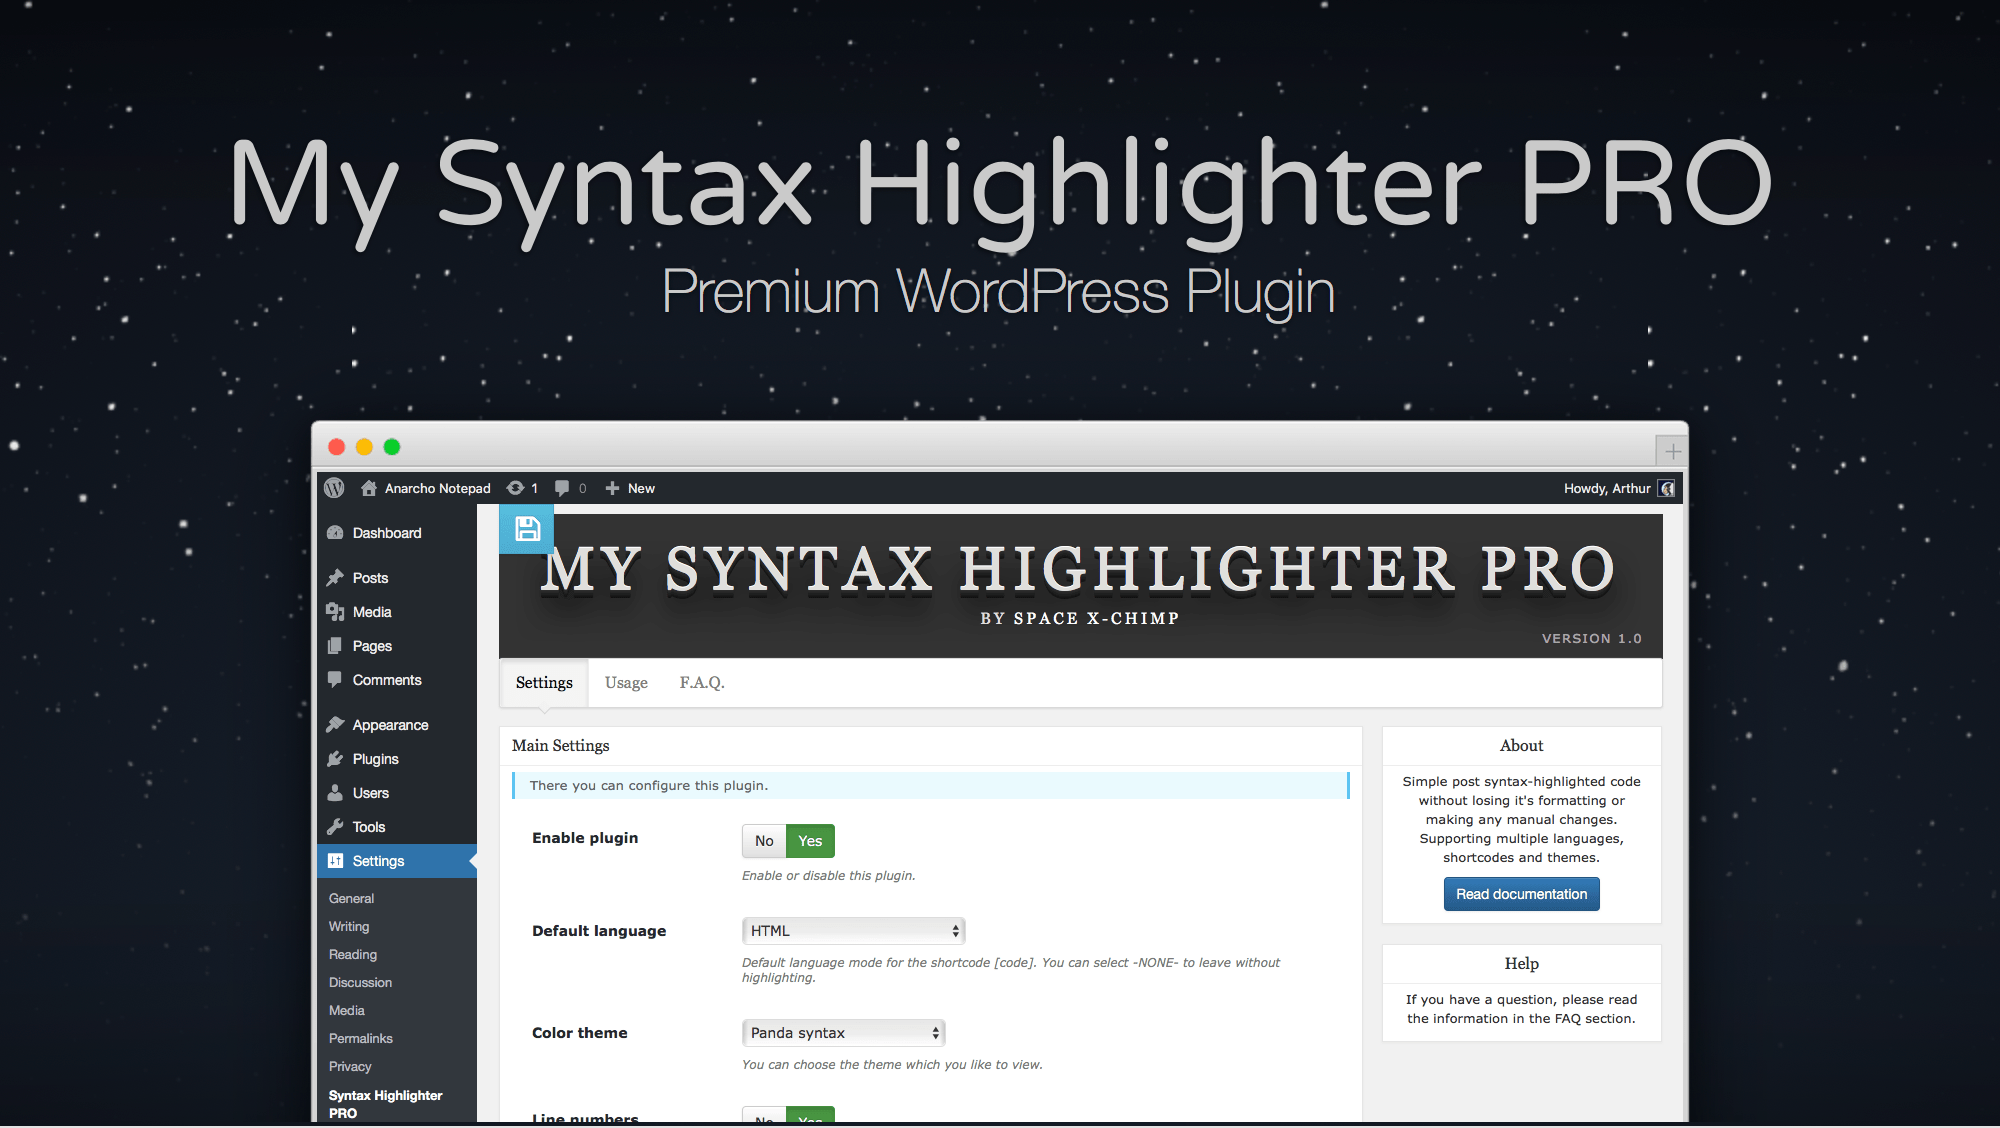
After installation and activation, the Syntax Highlighter PRO menu item will appear in the Settings section of Admin Area. Click on it in order to view the plugin settings page.
Manual installation (via FTP access)
To install the plugin manually (by simply uploading all files via FTP or SFTP), please perform the following steps:
- Download the ZIP archive with this plugin to your computer. After downloading you should have a ZIP archive called
my-syntax-highlighter-pro.1.0.zip. This is a compressed file containing all the folders and files required for the plugin to function properly. - Unzip the ZIP archive with this plugin on your computer. You’ll get the folder
my-syntax-highlighter-pro.You need to preserve the directory structure in the archive when extracting these files.
- Access your server via FTP or SFTP.
If you aren’t sure how usually your web hosting provider will have instructions somewhere on their website.
- Browse to the directory
wp-content/plugins/.The location of the folder
wp-contentdepends on your host’s setup. Typically, the folderpublic_htmlcontains all the files of the website, among which you will find this folder. Please contact your web hosting company to get help if you can’t find this folder. - Upload the plugin folder
my-syntax-highlighter-profrom step 1. Wait for the uploading to complete, it may take several minutes. Once the upload complete, the plugin should be inwp-content/plugins/my-syntax-highlighter-pro/on your server. - Log in to Admin Area of your WordPress website.
- Activate the plugin through the
Pluginstab.
After installation and activation, the Syntax Highlighter PRO menu item will appear in the Settings section of Admin Area. Click on it in order to view the plugin settings page.
Update plugin to new release
The “My Syntax Highlighter PRO” plugin can be updated to the new release just as you would any other premium WordPress plugin.
We have three types of updates:
- Adding new features - We add new features to the plugin whenever we have a new cool feature requests by our customers, as well as our team.
- Code improvement - This makes the plugin more stable and faster, and also improves security.
- Solving bugs or issues - If any bugs or issues appear due to browser updates or WordPress version changes, we make sure to update the plugin ASAP to keep you and visitors of your website safe.
Regardless of the type of updates, they should be applied as soon as conveniently possible.
Automatic update (via WordPress Admin Area):
Unfortunately, there is no way yet to update the plugin automatically. Sorry for the inconvenience. But we will do our best to find a way to change this as soon as possible. We plan to implement an automatic plugin update system in one of the upcoming plugin updates, so that you no longer have to install updates manually.
Update via FTP or SFTP:
To update the plugin manually (by simply overriding all files via FTP or SFTP), please perform the following steps:
- Log in to Admin Area of your WordPress website.
- Deactivate this plugin through the
Pluginstab. - Download the ZIP archive with the new version of this plugin to your computer. After downloading you should have a ZIP archive called
my-syntax-highlighter-pro.1.0.zip. This is a compressed file containing all the folders and files required for the plugin to function properly. - Unzip the ZIP archive with the new version of this plugin on your computer. You’ll get the folder
my-syntax-highlighter-pro.You need to preserve the directory structure in the archive when extracting these files.
- Access your server via FTP or SFTP.
If you aren’t sure how usually your web hosting provider will have instructions somewhere on their website.
- Browse to the directory
wp-content/plugins/.The location of the folder
wp-contentdepends on your host’s setup. Typically, the folderpublic_htmlcontains all the files of the website, among which you will find this folder. Please contact your web hosting company to get help if you can’t find this folder. - It’s best to have a backup, so download the plugin folder
my-syntax-highlighter-proto your computer. - Upload the plugin folder
my-syntax-highlighter-profrom step 4, with replacing the current folder of the plugin. Wait for the uploading to complete, it may take several minutes. Once the upload complete, the plugin should be inwp-content/plugins/my-syntax-highlighter-pro/on your server.Important! Sometimes files are deleted inside the plugin folder so make sure that your program is deleting all files and uploading the new ones when it overrides instead of simply “updating newer files”. It can cause issues if you have files on your server inside the plugin folder that are no longer used in the plugin itself.
- Activate this plugin through the
Pluginstab.
Note! After you are done updating a plugin please also clear your website and browser cache to prevent errors (this should be done when updating any theme or plugin).
License key
You will receive a license key along with your purchase confirmation. As long as it is active, this key allows you to get updates for the purchased WordPress plugin and get access to premium support.
To enter your license key into the plugin, please perform the following steps:
-
Log in to Admin Area of your WordPress website.
-
Go to
Settings->Syntax Highlighter PRO. You will be taken to the plugin settings page.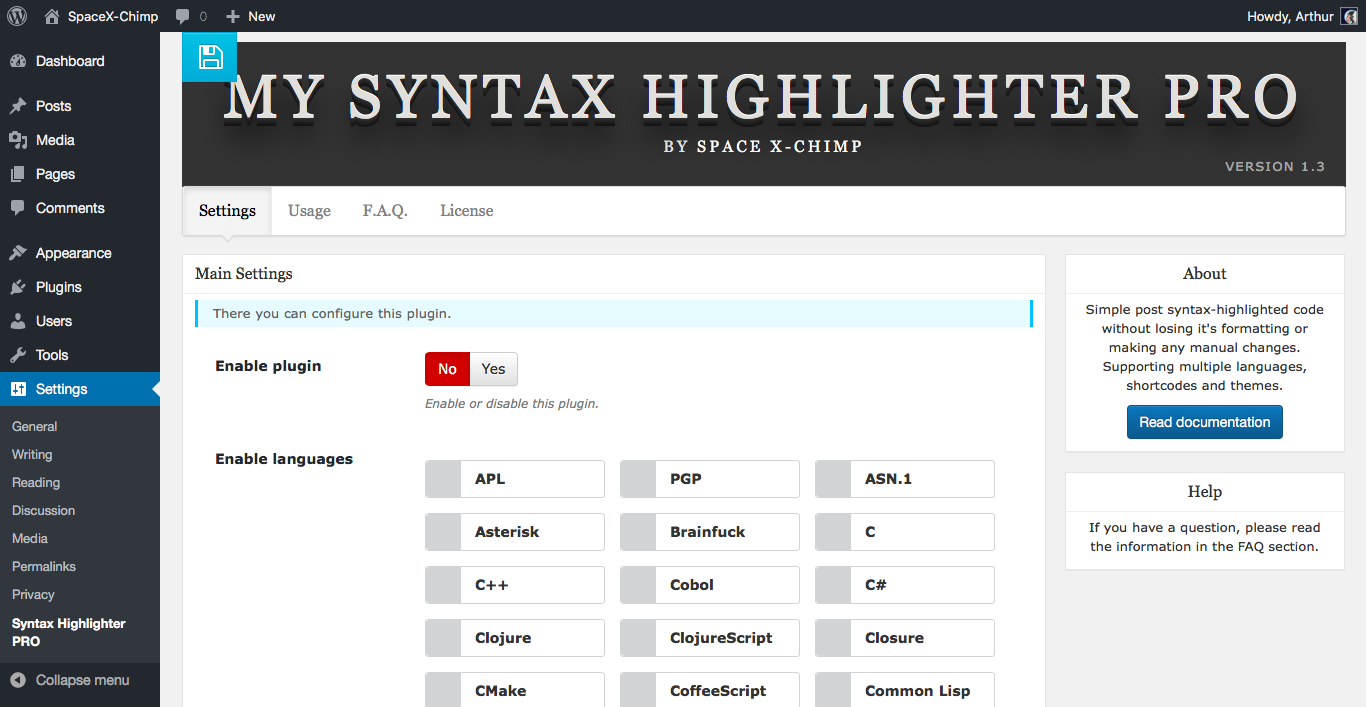
-
Navigate to the
Licensetab.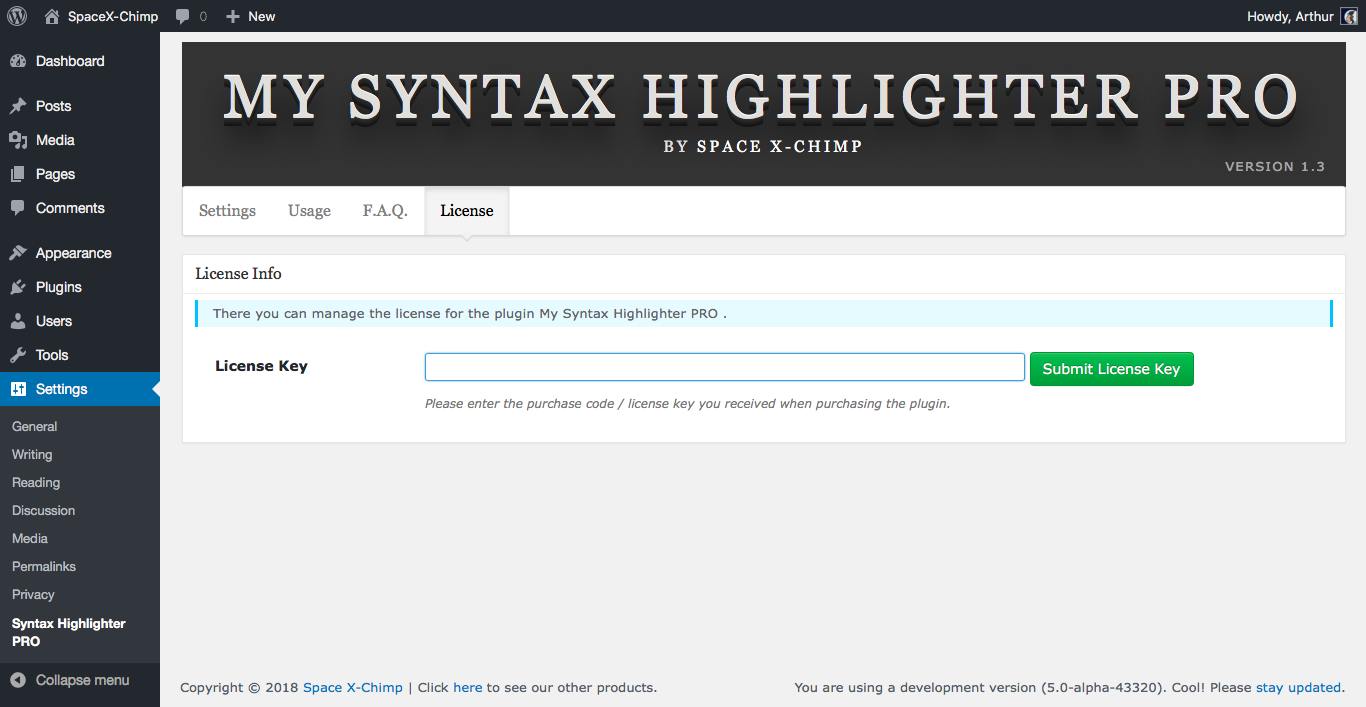
- Enter your license key in the field
License Key. - Click the
Submit License Keybutton.
Using at first time
To use this plugin at first time just do the following:
-
Log in to Admin Area of your WordPress website.
-
Go to
Settings->Syntax Highlighter PRO. You will be taken to the plugin settings page. - Select the desired settings.
- Click the
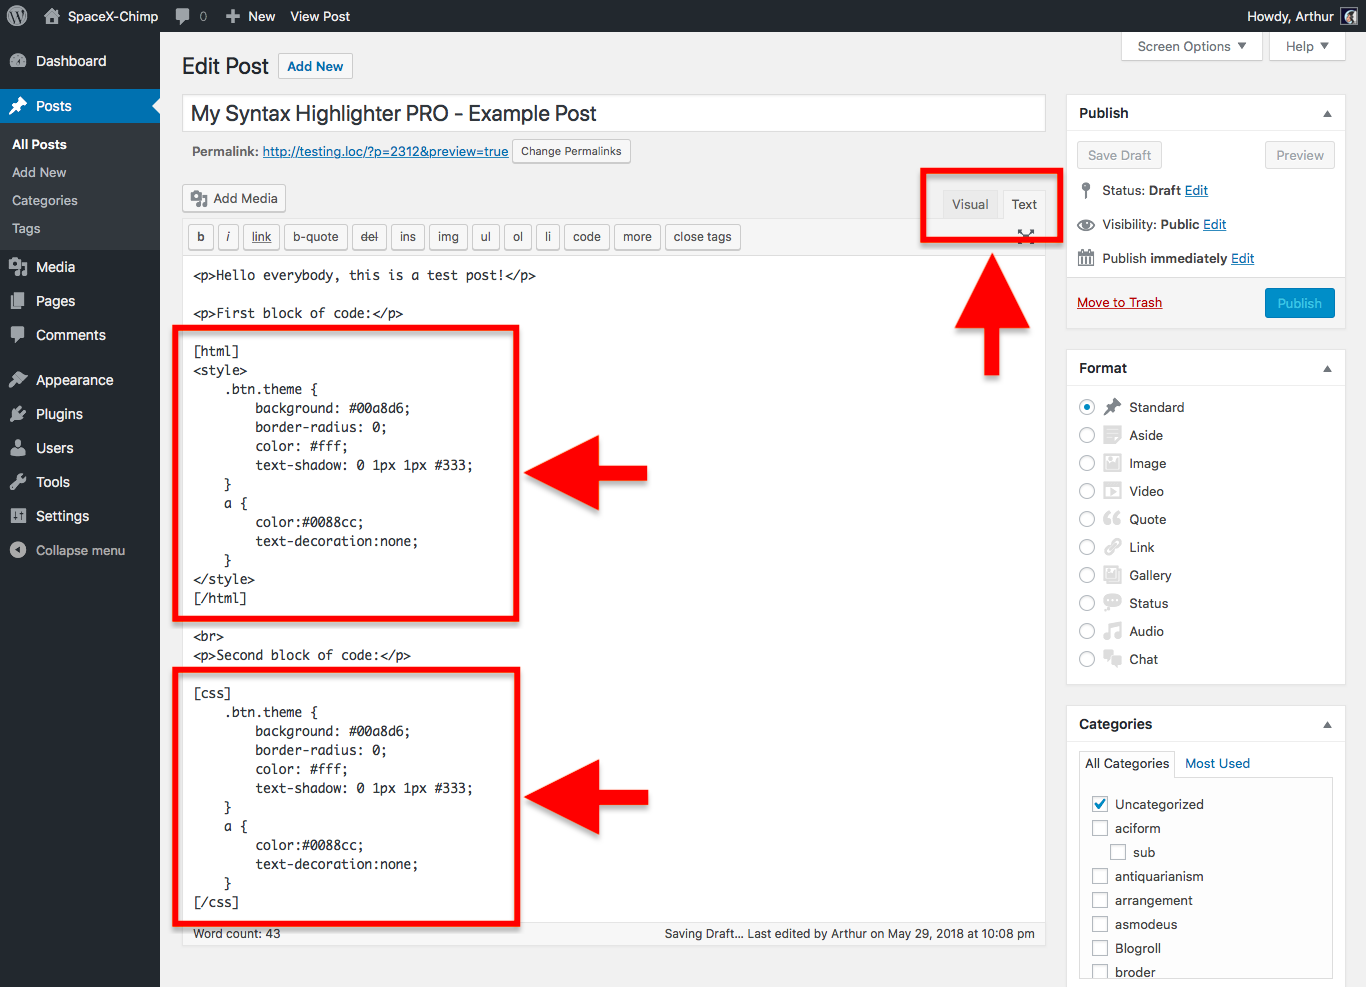
Save changesbutton. - On the WordPress Post/Page Editor page switch to the Text/HTML editor and wrap your source code in one of the supported shortcodes (like
[code]...[/code]that is universal shortcode). Example:
[code]
This

is

an "example"!
[/code]
In this case, the shortcode will prevent WordPress from inserting paragraph breaks between This, is and an "example", as well as ensure that the double quotes around example are not converted to typographic (curly) quotes.
Note! To avoid problems, edit posts that contain your source code only in Text/HTML mode.
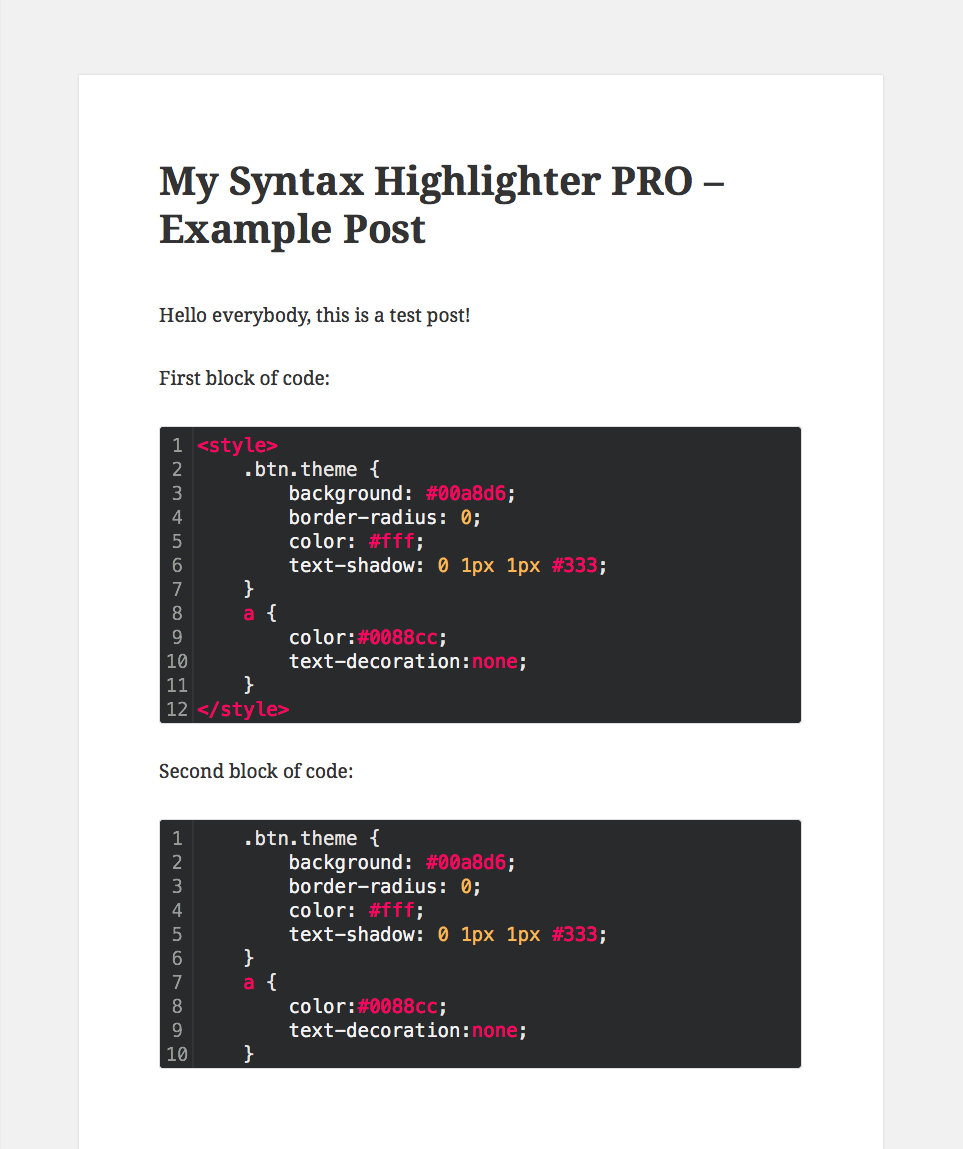
Enjoy the fancy syntax highlighting on your website. It’s that simple!
Customization
Our programmers and designers have done a great job to make the plugin easily customizable using the plugin settings page interface.
You can easily customize it by simply selecting the desired settings. And if you want more options, let us know and we will be happy to add them. We will do our best to better develop the plugin and add the requested features as soon as possible.
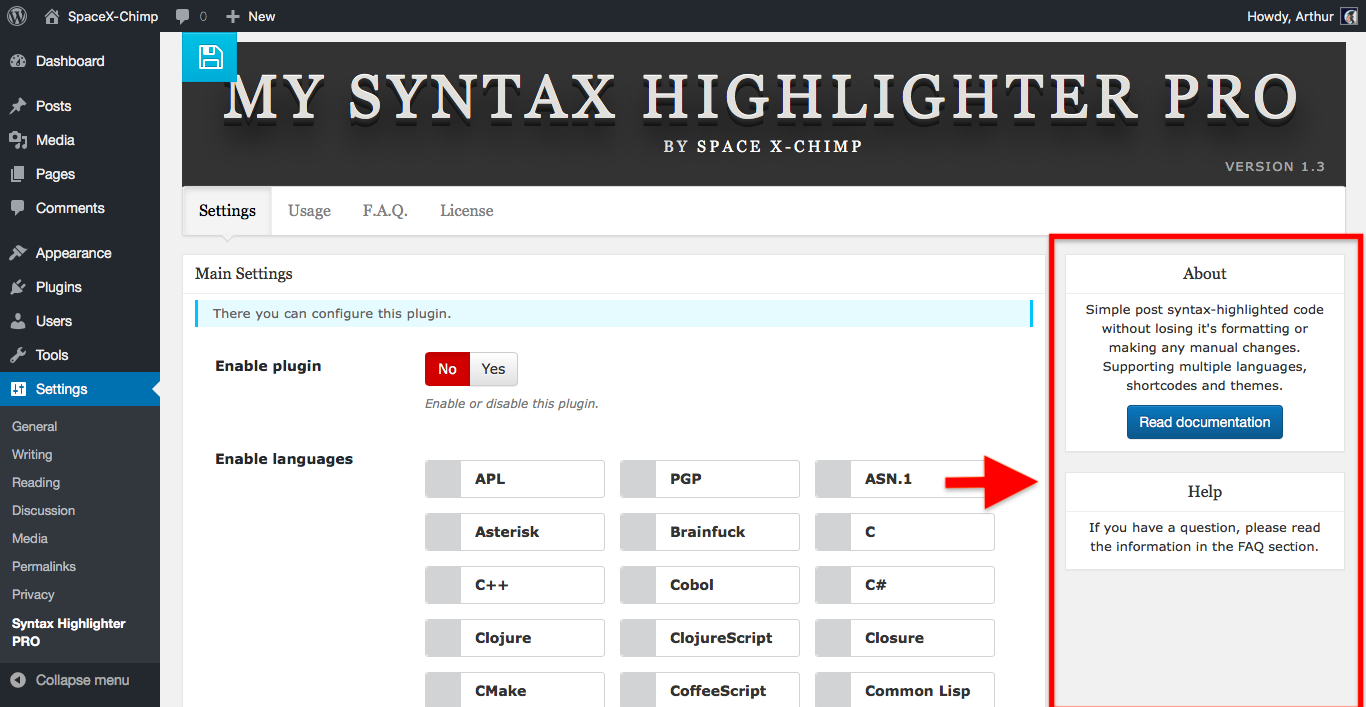
Sidebar
The sidebar consists of several sections. It gives you quick access to the documentation of the plugin. We plan to add some more useful features here soon.
Troubleshooting
As with every plugin, it’s possible that things don’t work. It’s impossible to tell what could be wrong exactly.
The most common cause of any type of problem experienced by users is the website cache and the plugin conflict. Our plugin is compatible with most third-party plugins and themes. But, unfortunately, we cannot check it with all third-party plugins and themes (especially paid ones) for compatibility, therefore there are cases when the plugin does not work with a third-party plugin or theme. We constantly check our plugin for compatibility with third-party plugins and themes. If we find that our plugin is incompatible with a third-party plugin or theme, and if we can fix it on our part, we release an update of the plugin to fix the problem.
Perhaps the problem will be solved by one of the following solutions. Please try this and let us know. Thank you!
- Please try to clear your browser’s cache. Every web browser stores a cache of the websites you visit (pages, images, and etc.) to reduce bandwidth usage and server load.
- Please try to clear your website’s cache created by any kind of caching system, it could be a WordPress plugin or a web service such as the CloudFlare.
- Please try to re-login to your WordPress website.
- Please try to restart your computer or try on another computer.
- Please try to temporarily disable all other plugins and сheck if the issue persists. If the problem is gone, then the problem is in conflict with another plugin installed on your WordPress website.
- Please try to temporarily change the theme to the WordPress built-in theme “Twenty Nineteen” and сheck if the issue persists. If the problem is gone, then the problem is in conflict with the theme installed on your WordPress website.
Bug report
Bug reports are very welcome! Please visit our contact page and report. Thank you!
Please include as much information as possible, including a link to your website where the problem can be seen (if applicable). Describe in more detail what exactly you are seeing. Here are some examples:
- Elements of the plugin settings page are not working.
- An error message is displayed on the plugin settings page.
- An error message is displayed on the front-end of website.
- Website is crashed.
More help & support
If you have any questions that are beyond the scope of this documentation, please read the Frequently Asked Questions. If you still can’t find an answer to your enquiry, please don’t hesitate to contact us and we’ll be happy to help you out.
Answers to common questions about licenses, payment process, refunds and customer support can be found on the page Common Questions.